ここでは、SaaS環境などでテナント毎のデータをデータベースに保存していて、各テナント毎に個別の暗号化キーを利用して暗号化して運用したい場合の例になります。暗号化の鍵はSecret Managerを利用して管理する想定としています。KMS等を利用する事も可能です。
Step 1: Aurora MySQLテーブル作成
サンプルスキーマとテーブルを作成
CREATE DATABASE tenant_app;
USE tenant_app;

CREATE TABLE users (
 id INT AUTO_INCREMENT PRIMARY KEY,
 tenant_id VARCHAR(50) NOT NULL,
 username VARCHAR(100) NOT NULL,
 encrypted_email VARBINARY(255),
 encrypted_phone VARBINARY(255),
 created_at TIMESTAMP DEFAULT CURRENT_TIMESTAMP,
 INDEX idx_tenant (tenant_id)
);
Step 2: テナント毎のキーを作成
ここでは、2つのテナント用に暗号化キーを作成 :
# テナント1のキー作成
aws secretsmanager create-secret \
 —name "tenant/tenant-001/encryption-key" \
 —description "Encryption key for tenant-001" \
 —secret-string "$(openssl rand -hex 32)"

# テナント2のキー作成
aws secretsmanager create-secret \
 —name "tenant/tenant-002/encryption-key" \
 —description "Encryption key for tenant-002" \
 —secret-string "$(openssl rand -hex 32)"
作成したキーの確認 :
$ aws secretsmanager list-secrets --query 'SecretList[?contains(Name, `tenant/`)].Name'
[
    "tenant/tenant-001/encryption-key",
    "tenant/tenant-002/encryption-key"
]

$ aws secretsmanager get-secret-value \
>  --secret-id "tenant/tenant-001/encryption-key" \
>  --query 'SecretString' --output text
2606334f21b6177a4314e9909356ffaf6ae22a9227dcafe0353dff06023f18b6
$
Step 3: Python アプリケーション作成
環境設定ファイル (.env)
export DB_HOST="aurora-v3.xxxxxx.us-east-1.rds.amazonaws.com"
export DB_USER="user"
export DB_PASSWORD="password"
export AWS_REGION="us-east-1"
サンプルデータを作成する為のPythonサンプル (app-jp.py)
import boto3
import pymysql
import os

class TenantEncryption:
    def __init__(self):
        self.secrets = boto3.client('secretsmanager')
        self.connection = pymysql.connect(
            host=os.environ['DB_HOST'],
            user=os.environ['DB_USER'],
            password=os.environ['DB_PASSWORD'],
            database='tenant_app'
        )

    def get_tenant_key(self, tenant_id):
        response = self.secrets.get_secret_value(
            SecretId=f'tenant/{tenant_id}/encryption-key'
        )
        return response['SecretString']

    def create_user(self, tenant_id, username, email, phone):
        key = self.get_tenant_key(tenant_id)
        cursor = self.connection.cursor()

        cursor.execute("""
            INSERT INTO users (tenant_id, username, encrypted_email, encrypted_phone)
            VALUES (%s, %s, AES_ENCRYPT(%s, %s), AES_ENCRYPT(%s, %s))
        """, (tenant_id, username, email, key, phone, key))

        self.connection.commit()
        return cursor.lastrowid

    def get_user(self, tenant_id, user_id):
        key = self.get_tenant_key(tenant_id)
        cursor = self.connection.cursor()

        cursor.execute("""
            SELECT id, username,
                   AES_DECRYPT(encrypted_email, %s) as email,
                   AES_DECRYPT(encrypted_phone, %s) as phone
            FROM users
            WHERE tenant_id = %s AND id = %s
        """, (key, key, tenant_id, user_id))

        return cursor.fetchone()

    def list_users(self, tenant_id):
        key = self.get_tenant_key(tenant_id)
        cursor = self.connection.cursor()

        cursor.execute("""
            SELECT id, username,
                   AES_DECRYPT(encrypted_email, %s) as email,
                   AES_DECRYPT(encrypted_phone, %s) as phone
            FROM users
            WHERE tenant_id = %s
        """, (key, key, tenant_id))

        return cursor.fetchall()

# 使用例
if __name__ == "__main__":
    app = TenantEncryption()

    # テナント001のユーザー作成
    user_id = app.create_user(
        'tenant-001',
        'john_doe',
        'john@example.com',
        '123-456-7890'
    )
    print(f"Created user ID: {user_id}")

    # ユーザー取得
    user = app.get_user('tenant-001', user_id)
    print(f"User: {user}")

    # テナント002のユーザー作成
    app.create_user(
        'tenant-002',
        'Shinya Sugiyama',
        'shinyajp@example.com',
        '090-777-8888'
    )

    # テナント別ユーザー一覧
    users_001 = app.list_users('tenant-001')
    users_002 = app.list_users('tenant-002')

    print(f"Tenant 001 users: {users_001}")
    print(f"Tenant 002 users: {users_002}")
Step 5: 必要なパッケージインストール
ここは環境によるので、必要に応じてパッケージをインストール
pip install boto3 pymysql python-dotenv
pip install —upgrade boto3 botocore
Step 6: IAMポリシー設定
アプリケーションサーバー等に権限を付与しても良いと思います。
ここでは、Step2で作成したSecret Managerのキーへのアクセス権限を付与しています。
{
    "Version": "2012-10-17",
    "Statement": [
        {
            "Effect": "Allow",
            "Action": [
                "secretsmanager:GetSecretValue"
            ],
            "Resource": "arn:aws:secretsmanager:*:*:secret:tenant/*/encryption-key-*"
        }
    ]
}
Step 7: 実行
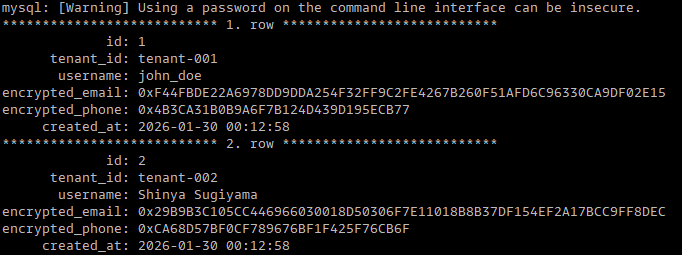
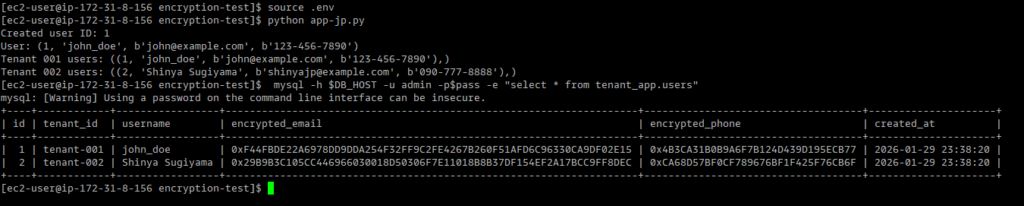
ここでは、データをINSERT時にそれぞれのテナントキーで暗号化して、暗号化されているか確認しています。
source .env
python app-jp.py
Step 8: 復号化の確認
復号化のスクリプトでテナント(tenant-001)の暗号化キーのみを指定した場合にtenant-002のデータが読めない事を確認。
Sample Code (decode-with-single-tenant-key.py):
#!/usr/bin/env python3
# -*- coding: utf-8 -*-

import boto3
import pymysql
import os

# データベース接続
connection = pymysql.connect(
    host=os.environ['DB_HOST'],
    user=os.environ['DB_USER'],
    password=os.environ['DB_PASSWORD'],
    database='tenant_app',
    charset='utf8mb4'
)

# Secrets Managerクライアント
secrets = boto3.client('secretsmanager')

# tenant-001のキーを1つだけ取得
print("=" * 80)
print("1つのSecretキーで復号化テスト")
print("=" * 80)
print()

# tenant-001のキーを取得
tenant_key = secrets.get_secret_value(SecretId='tenant/tenant-001/encryption-key')['SecretString']
print(f"使用するキー: tenant-001のキー")
print()

# データベースから全ユーザーを取得して復号化を試みる
cursor = connection.cursor()
cursor.execute("""
    SELECT
        id,
        tenant_id,
        username,
        CAST(AES_DECRYPT(encrypted_email, %s) AS CHAR CHARACTER SET utf8mb4) as email,
        CAST(AES_DECRYPT(encrypted_phone, %s) AS CHAR CHARACTER SET utf8mb4) as phone
    FROM users
    ORDER BY id
""", (tenant_key, tenant_key))

results = cursor.fetchall()

print("復号化結果:")
print("-" * 80)

success_count = 0
fail_count = 0

for row in results:
    user_id, tenant_id, username, email, phone = row

    print(f"ID: {user_id} | テナント: {tenant_id} | ユーザー名: {username}")

    if email is not None and phone is not None:
        print(f"  ✅ 復号化成功")
        print(f"     メール: {email}")
        print(f"     電話番号: {phone}")
        success_count += 1
    else:
        print(f"  ❌ 復号化失敗(NULL)")
        print(f"     メール: {email}")
        print(f"     電話番号: {phone}")
        fail_count += 1
    print()

print("=" * 80)
print("結果サマリー")
print("=" * 80)
print(f"復号化成功: {success_count}件")
print(f"復号化失敗: {fail_count}件")
print()
print("結論:")
if success_count == 1 and fail_count >= 1:
    print("✅ 1つのキーでは、そのテナントのデータ1件のみ復号化できました")
    print("✅ 他のテナントのデータは復号化できませんでした")
    print("✅ テナント間のデータ分離が正しく機能しています")
else:
    print("⚠️  予期しない結果です")

connection.close()
復号化結果 :
キーを指定した、テナントのメールアドレスと電話番号のみ復号化して参照出来る事を確認できました。参照時は暗号化されていないID等にインデックスを貼るか、HASH化したメールアドレス等にインデックスを貼って検索する事はできますが、HASH化されているのでLike検索等は出来ません。用途に合わせて別途方法を検討すると良いでしょう。
